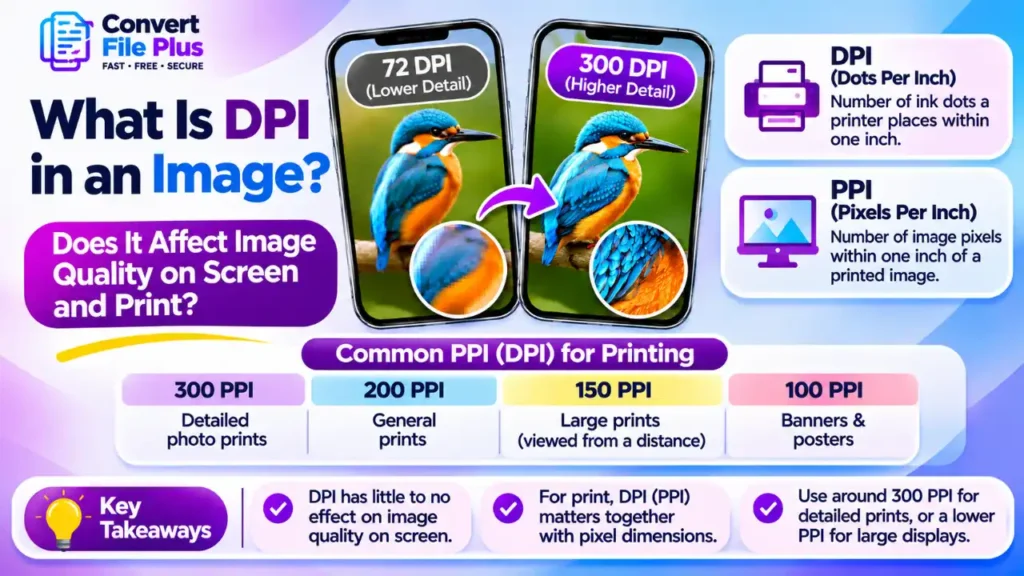
DPI (dots per inch) refers to the number of ink or toner dots a printer places within one inch. PPI (pixels per inch), on the other hand, describes how many image pixels are placed within each inch of a printed image. Although the terms are often used interchangeably, they measure different things. On a screen, DPI has almost no effect on quality. In print, it matters, but only together with the image’s pixel dimensions.
This guide explains the difference, shows a simple calculation you can reuse, and lists what to check before sending an image to a printer or uploading it to a website.
DPI and PPI: what is the difference?
The two terms are often used as if they mean the same thing, which is where most of the confusion starts.
- Pixels are the tiny squares of colour that make up a digital image. A photo that is 3000 × 2000 pixels has 6 million of them.
- PPI (pixels per inch) is how many of those pixels are used per inch when the image is displayed or printed at a given size.
- DPI (dots per inch) strictly refers to a printer’s ink or toner dots. A printer builds each pixel from several tiny dots.
In everyday use, “DPI” is also the label many programs and print shops give to an image’s resolution setting. When someone says “this image is 300 DPI,” they almost always mean 300 PPI. This article uses both terms where the source or software does.
One more fact matters here. Adobe describes image size as the number of pixels along an image’s width and height, and that pixel count is what holds the actual detail. The DPI number is a label that says how big those pixels should be when printed.
Does DPI affect image quality on screen?
Not in any meaningful way. A screen shows an image by mapping its pixels to the pixels of the display. The displayed size depends on the image’s pixel dimensions, the screen’s pixel density, display resolution and how the browser or application scales the image. The DPI value stored in the file is not part of that.
That is why advice about web images keeps pointing to pixel dimensions. One Photoshop guide puts it plainly: for web images, ignore resolution, including “72 ppi”, and consider only the pixel dimensions.
A practical example (illustrative, not a test result): take one photo, 1200 × 800 pixels, and save it twice, once labelled 72 DPI and once labelled 300 DPI. Put both on a web page and they will look identical, because they contain the same pixels. The only difference is a number in the file’s metadata.
So if a website asks for a “72 DPI image,” what you really need to check is whether the pixel dimensions suit the space where the image will appear.
Does DPI affect image quality in print?
Yes, but indirectly. In print, DPI/PPI decides how large each pixel becomes on paper. The same pixels spread over a larger area look coarser, and over a smaller area look sharper.
The relationship is simple:
Print size (inches) = pixels ÷ PPI
Here is an illustrative example using a 3000 × 2000 pixel photo:
| Print PPI | Print size | What to expect |
|---|---|---|
| 300 | 10 × 6.7 in | A common target for detailed photo prints when the source image supports it. |
| 200 | 15 × 10 in | Can produce good results for many prints, depending on viewing distance and printer capability. |
| 150 | 20 × 13.3 in | Softer when examined up close |
| 100 | 30 × 20 in | Suitable for viewing from a distance, such as banners |
The 300 PPI figure is a widely used target for photos, but it is a guideline and not a law. Banners can often be printed at around 100 ppi, because people view them from far away. Your printer’s own specification is always the better reference.
Notice what changed in the table. The image file stayed the same. Only the print size changed, and with it the effective PPI.
Why changing the DPI number does not add detail
This is the mistake that costs people the most time. Suppose you have a small 600 × 400 pixel image, and you change its DPI setting to 300 without resampling. It will simply print at 2 × 1.3 inches. Nothing was added.
Adobe’s documentation explains the two situations clearly:
- If you keep the pixel count constant, you can increase the print size and lower the resolution, or increase the resolution and lower the print size. No resampling occurs, so image quality is not diminished.
- Changing the pixel dimensions is called resampling, and resampling can degrade image quality.
If you do resample upward to hit a higher DPI at a larger size, the software has to invent new pixels. That can make a small image look smoother, but it cannot restore detail that was never captured.
Before printing, set the intended print dimensions and check the resulting PPI without resampling. If the resolution is too low for the required print size, use a higher-resolution original or consider careful upscaling. Remember that upscaling adds pixels but cannot recover missing original detail.
How to check an image before printing
Follow this order and you will avoid most problems.
- Find the pixel dimensions. On Windows, right-click the file, choose Properties, then Details. On Mac, use Preview’s Tools > Show Inspector to check available image information. If the PPI value is not displayed, check the image in an editor such as Photoshop. In Photoshop, use Image > Image Size.
- Decide the print size you actually want, in inches or centimetres.
- Divide pixels by print size. A 3000-pixel-wide image printed 10 inches wide gives 300 PPI.
- Compare with your printer’s requirement. Many shops state a minimum PPI for the print type you chose.
- If the number is too low, reduce the print size, use a higher-resolution original, or rescan at a higher setting. Upscaling is a last resort.
- Ask for a proof when the print is large or expensive.
Common mistakes
- Treating 72 DPI as “web quality.” It is a historical convention. Pixel dimensions are what matter online.
- Raising DPI on a small image and expecting a sharper print. Without more pixels, the print only gets smaller.
- Confusing screen shape with resolution. A phone and a monitor can show the same file at very different physical sizes, which is one reason images can look different between devices. ConvertFilePlus covers that in why images look different on different screens.
- Using heavily compressed JPEGs for print. A large pixel count cannot restore fine details lost through excessive compression. Always inspect the image at 100% zoom before printing.
- Ignoring file size on websites. More pixels than needed slows pages down. See why images lose quality when uploaded to websites for related causes.
Setting the right pixel dimensions
If you only need a smaller or correctly sized image for a website or social post, the key setting is width and height in pixels. The ConvertFilePlus image converter lets you adjust image dimensions and choose an output format, helping you prepare images for websites and other digital uses. Check the result at 100% zoom before you publish it.
Note that resizing changes pixel dimensions. It is separate from the DPI label inside the file, and a printer will work from the pixel count and your requested print size.
FAQs
Conclusion
Think in pixels first. For screens, the pixel dimensions are the whole story. For print, divide pixels by the print size to get your real PPI, then compare it with your printer’s requirement. If the number falls short, reduce the print size or find a higher-resolution original before reaching for upscaling.

- What Is DPI in an Image? Does It Affect Image Quality on Screen and Print? - November 15, 2026
- Why Does WhatsApp Reduce Photo Quality? How to Send Images in HD - November 11, 2026
- Why Does Instagram Crop My Photos When I Upload Them? How to Fix It - November 9, 2026