

To remove unwanted objects from an image with AI, open the photo in an editor with an object removal tool, select the distraction, and let the software fill the area. Then inspect the result at 100% zoom and refine any visible edges or texture problems.
AI object removal works best when the background is simple and the selected object is small. Large objects, overlapping subjects, and detailed patterns may need several attempts or manual editing.
This guide explains how these tools fill the space, compares three common routes (Apple Photos, Google Photos and Photoshop), and shows how to check and fix the result.
How AI object removal works
These tools don’t delete an object so much as replace it. Once you mark it, the software has to work out what could plausibly sit behind it. Google described its Magic Eraser as using machine learning to understand what you selected, then predict what the pixels would look like if the distraction weren’t there.
Two practical points follow from that.
The fill is a prediction. It isn’t the true scene behind the object, because the camera never captured it. Plain sky, water, grass or a smooth wall give the tool plenty to work from. A railing, a crowd or a brick pattern behind the object is much harder to reconstruct.
Tools differ in how they fill. Adobe’s Remove tool lets you set its mode to Generative AI on, Generative AI off, or Auto. Switching modes is one of the first things to try when a fill looks wrong.
Choose a tool for the job
You probably already own a suitable tool. This table compares the options described in each vendor’s own documentation.
| Tool | Best for | How you select | Worth knowing |
| Apple Photos, Clean Up | Distractions in a photo’s background | Click or tap highlighted suggestions, or brush, circle or click | Requires Apple Intelligence. Availability varies by language and region. Brushing over a face may blur it with a pixelated effect. |
| Google Photos, Magic Eraser | Quick fixes on smaller parts of a photo | Tap suggestions, or circle or brush | Google says Magic Editor’s generative Erase suits larger, more complex objects. Feature availability varies by device. |
| Photoshop, Remove tool | Small to medium distractions with desktop control | Brush over the area, or loop around it | Offers Generative AI on, off, or Auto modes. Adobe says using the Remove tool does not deduct generative credits; access to Photoshop itself depends on the available plan or licence. |
| Photoshop, Content-Aware Fill | Larger objects and people | Any selection tool, then Edit > Content-Aware Fill | Adobe describes it as suited to large objects, even against complex backgrounds. A Sampling Brush controls which areas are used as source material. |
Free browser-based object removers also exist. We haven’t tested them, so check each one’s privacy terms before uploading a personal photo. Many online tools send your image to a server.
Step-by-step: remove an object from a photo
Before you start:
- Work on a copy, or save the edit as a copy, so you keep the original.
- Use the highest-resolution version you have.
- Decide whether the object has a shadow or reflection that should go with it.
Steps:
- Open the photo in edit mode and zoom in. Zooming makes a precise selection much easier.
- Pick the removal tool. That’s Clean Up in Apple Photos, Magic Eraser in Google Photos, or the Remove tool in Photoshop.
- Mark the object. On a phone, tap a highlighted suggestion or brush or circle the object. In Photoshop, Adobe advises choosing a brush size slightly larger than the area so one stroke covers it, or looping the brush around it like a lasso. Include a small margin around the object so edges don’t remain.
- Apply the fill and inspect it before accepting. Don’t judge the result at thumbnail size.
- Repeat in small pieces. For large or complicated areas, Adobe suggests turning off “Remove after each stroke” so you can make several strokes before the fill is applied.
- Save as a copy.
Where to find the tool:
- Apple Photos on Mac: open the photo, click Edit, then Tools, then Clean Up. Click the brush under Erase, then click, brush or circle the item. On iPhone, the flow is similar (Edit, then Clean Up).
- Google Photos: open the photo and tap Edit. Find Magic Eraser in the available editing tools, Actions section, or tool search, depending on your device and app version. Select or brush over the object, apply the edit, and review the result before saving.
- Photoshop: select the Remove tool in the toolbar. If you can’t see it, press and hold the Spot Healing Brush to reveal related tools.
When removal works well, and when it doesn’t
AI removal tends to work well when the object is small and isolated, the background is plain or repetitive, and the object doesn’t touch your main subject.
It tends to struggle in these cases:
- The object overlaps the person or item you want to keep.
- The background has fine structure, such as fences, foliage, text or tiled floors.
- The object takes up a large share of the frame.
- A face is involved, which is why Apple warns that faces may be blurred.
For a larger object in Photoshop, Content-Aware Fill is usually the better route. Adobe notes that selection tools often cut tightly around an object, and that including some of the surrounding area helps the fill. After making the selection, Edit > Content-Aware Fill shows the areas that will be sampled.
Removal also can’t fix an underlying problem. It won’t restore a blurry subject or add detail the camera missed.
Check the result before you use it
Zoom to 100% and look at the repaired area slowly. These are the signs a fill needs more work:
- Repeated patterns, such as the same leaf or window appearing twice
- Smeared or unusually soft texture compared with the rest of the photo
- Straight lines, such as horizons or building edges, that bend or break
- A leftover shadow, reflection or faint outline of the object
- A strange shape where the object used to be
Compare the edit against the original, then view it at the size you’ll actually publish.
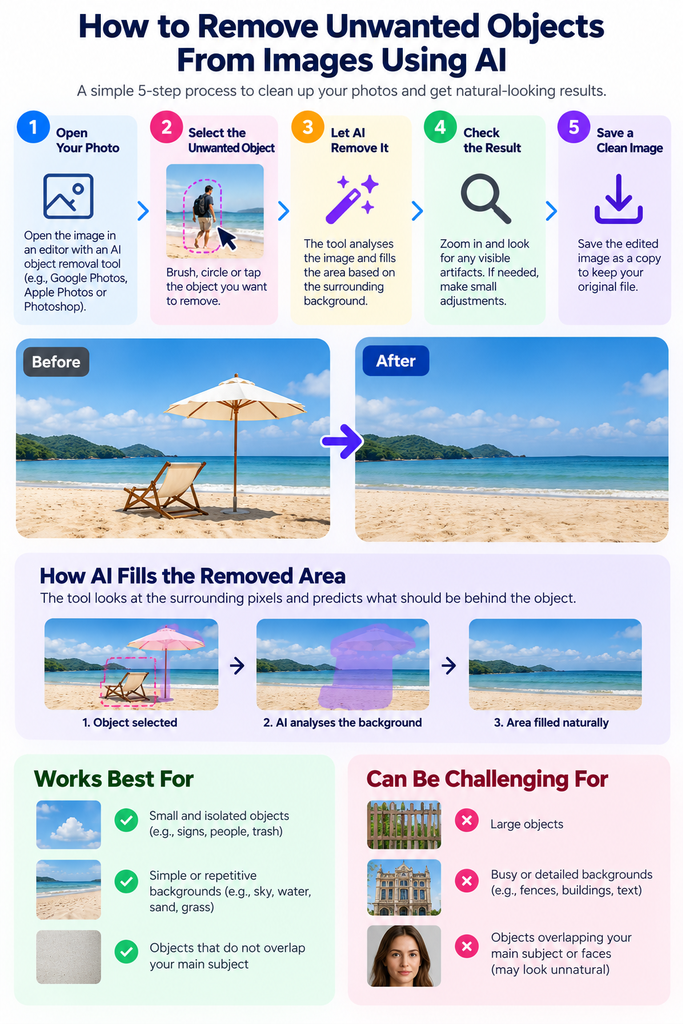
Quick workflow: Remove, check, refine
Use this visual workflow to remove an unwanted object, inspect the filled area, and refine any visible imperfections before saving the image.
Fix common problems
A faint outline or smudge remains. Undo, select a slightly larger area that includes the shadow, and run the removal again.
The tool selected the wrong thing. Zoom in and use a smaller brush. In Google’s selection view you can add to or subtract from the highlighted area. In Photoshop, undo and re-brush.
The fill looks repeated or blurry. Remove the object in smaller pieces. In Photoshop, try a different Remove tool mode or switch to Content-Aware Fill. A tool that works well on one photo may not work on another, so trying a second tool is reasonable.
The finished image looks soft. The edit may not be the cause. If the original is low resolution, see our guide to enlarging a low-resolution photo, which explains why adding pixels doesn’t recover missing detail.
The saved file is too large for your website. Learn how to reduce the file size without making it blurry, and choose the right image format before you export.
Use object removal responsibly
Removing an object changes what a photo shows. That’s fine for a holiday snapshot or a social post of your own photo. It needs more care in these situations:
- News or documentary images
- Insurance, legal or property listings, where removing a defect could mislead a buyer
- Passport and other identity photos, where the issuing authority sets the rules. Check the official requirements first.
If your real goal is to remove the whole background rather than one object, that’s a different task. See AI background removers compared.
Frequently asked questions
Next step
Start with the simplest tool you already have, remove small distractions first, and always inspect the result at 100%. Before putting the edited photo on a website, compress and export it so it loads quickly without looking soft.

- Why Won’t My iPhone Photos Open on Windows? HEIC to JPG Fix - October 26, 2026
- How to Remove Unwanted Objects From Images Using AI - October 25, 2026
- How to Increase the Resolution of an Image in 5 Steps - October 24, 2026